Saturday, 27 July 2024, 1:06 PM
Site: Unitec Online
Course: Guide to Moodle (Guide to Moodle)
Glossary: Guide to Moodle
William(Administrator) Lu (No Reply)

Editing icons

When you turn editing on in a course, you will see a range of icons:

Edit titleEdit the title of the resource on the page

Move right (or left)Move to the right (or left for a left arrow) resources

MoveMove things by clicking and dragging this icon

EditEdit / Update / Configure - takes you to settings

DuplicateDuplicate makes a clone/copy of the resource or activity

DeleteDelete removes the resource, activity or block from the course

Hide/ShowHide/show lets you make resources or activities visible/invisible to students

Group optionsGroup options - No groups

Group optionsGroup options - Separate groups

Group optionsGroup options - Visible groups

Assign rolesAssign roles lets you assign special privileges (like teacher rights) to a specific activity within the course

Email notifications

Adjusting all email notifications from Moodle

  1. Log into Moodle
  2. Hover your cursor over your name in the top right
  3. Preferences> Message

Then you will see a long list of events that Moodle can send email notifications for. Choose which of them you wish (or don't wish) to receive by email, by using the check boxes.

When you are done, click "Save"


About email notifications from Moodle

Moodle is not an email platform. If you wish to email your students, please email them! Moodle does sometimes send email notifications of events that happen on Moodle such as:

  • a Moodle message has been received while the user is offline
  • a forum post to a subscribed forum (such as a news forum)
  • an upcoming event

These notifications sometimes fail, so they are not a reliable way of emailing your students. To email your students, send them an actual email.

Adjusting forum email digest settings

  1. Log into Moodle
  2. Click on your name "You are logged in as Firstname Lastname" in the top right
  3. Administration block > My profile settings > Edit profile
  4. Email digest type:
    • No digest (single email per forum post) - you will be emailed a separate email notification for every single forum post to a forum you are subscribed to. This can spam your email if you are subscribed to a busy forum, or many forums.
    • Complete (daily email with full posts) - you will receive one email per day with all that day's forum posts compiled on it, in full.
    • Subjects (daily email with subjects only) - you will receive one email per day with all that day's forum posts compiled on it in list format, showing only the subject lines. Click the subject lines to go to that forum post to read it (you may be required to log into Moodle to see the forum).
  5. Click "Update profile" at the bottom.

Enable Java on your computer

Find the Java Control Panel on Windows


Windows 8 


Use search to find the Control Panel

Press Windows logo key + W to open the Search charm to search settings
OR
Drag the Mouse pointer to the bottom-right corner of the screen, then click on the Search icon.

In the search box enter Java Control Panel

Click on the Java icon to open the Java Control Panel.


Windows XP


Click on the Start button and then click on the Control Panel option.

Double click on the Java icon to open the Java Control Panel.


Find the Java Control Panel on Mac


Launch the Java Control Panel on Mac OS X (10.7.3 and above)

Click on Apple icon on upper left of screen.

Go to System Preferences

Click on the Java icon to access the Java Control Panel.


Change Security settings:


Security tab: Allows you to configure various settings related to security such as grant permissions to content, alert users about site certificates, enable trusted publishers and blacklist revocation checks.


How to Enable Java on your browser


Firefox

  1. Open the Firefox browser or restart it, if it is already running
  2. From the Firefox menu, select Tools, then click the Add-ons option
  3. In the Add-ons Manager window, select Plugins
  4. Click Java (TM) Platform plugin (Windows) or Java Applet Plug-in (Mac OS X) to select it
  5. Check that the option selected is Ask to Activate or Always Activate or on older Firefox versions, click on the Enable button (if the button says Disable, Java is already enabled)


Safari

  1. Click on Safari and select Preferences
  2. Choose the Security option
  3. Select Allow Plug-ins, then click on Manage Website Settings
  4. Click on the Java item, select an option (Ask, Allow or Allow Always) from the pull-down list When visiting other websites
  5. Click Done, then close the Safari Preferences window


Enable JavaScript on browsers

Google Chrome

  1. On the web browser menu click on "Customize and control Google Chrome" and select "Settings".
  2. In the "Settings" section click on "Show advanced settings..."
  3. Under "Privacy" click on "Content settings..."
  4. When the dialog window opens, look for the "JavaScript" section and select "Allow all sites to run JavaScript (recommended)".
  5. Click on the "OK" button to close it.
  6. Close the "Settings" tab.
  7. Click on the "Reload this page" button of the web browser to refresh the page.


Internet Explorer

  1. On web browser menu click the "Tools" icon and select "Internet Options".
  2. In the "Internet Options" window select the "Security" tab.
  3. In the "Security" tab click on the "Custom level..." button.
  4. When the "Security Settings - Internet Zone" dialog window opens, look for the "Scripting" section.
  5. In the "Active Scripting" item select "Enable".
  6. When the "Warning!" window pops out asking "Are you sure you want to change the settings for this zone?" select "Yes".
  7. In the "Internet Options" window click on the "OK" button to close it.
  8. Click on the "Refresh" button of the web browser to refresh the page.


Mozilla Firefox

  1. In the address bar, type about:config and press Enter.
  2. Click "I'll be careful, I promise" if a warning message appears.
  3. In the search box, search for javascript.enabled
  4. Toggle the "javascript.enabled" preference (right-click and select "Toggle" or double-click the preference) to change the value from "false" to "true".
  5. Click on the "Reload current page" button of the web browser to refresh the page.


Apple Safari

  1. On the web browser menu click on "Edit" and select "Preferences".
  2. In the "Preferences" window select the "Security" tab.
  3. In the "Security" tab section "Web content" mark the "Enable JavaScript" checkbox.
  4. Click on the "Reload the current page" button of the web browser to refresh the page.

Enrolment - Automatic enrolment

By using the PeopleSoft code, you can let PeopleSoft automatically enrol your students into your Moodle course. They will be enrolled one week before the PeopleSoft course start date, and unenrolled two weeks after the PeopleSoft course end date.

If you need them in longer than these dates, please email yliu@unitec.ac.nz with the course code and the new requested start and end dates.

Instructions:

  1. Course Administration block > Edit settings
  2. Enter the PeopleSoft course code in the PeopleSoft ID field
  3. Click "Save changes" at the bottom

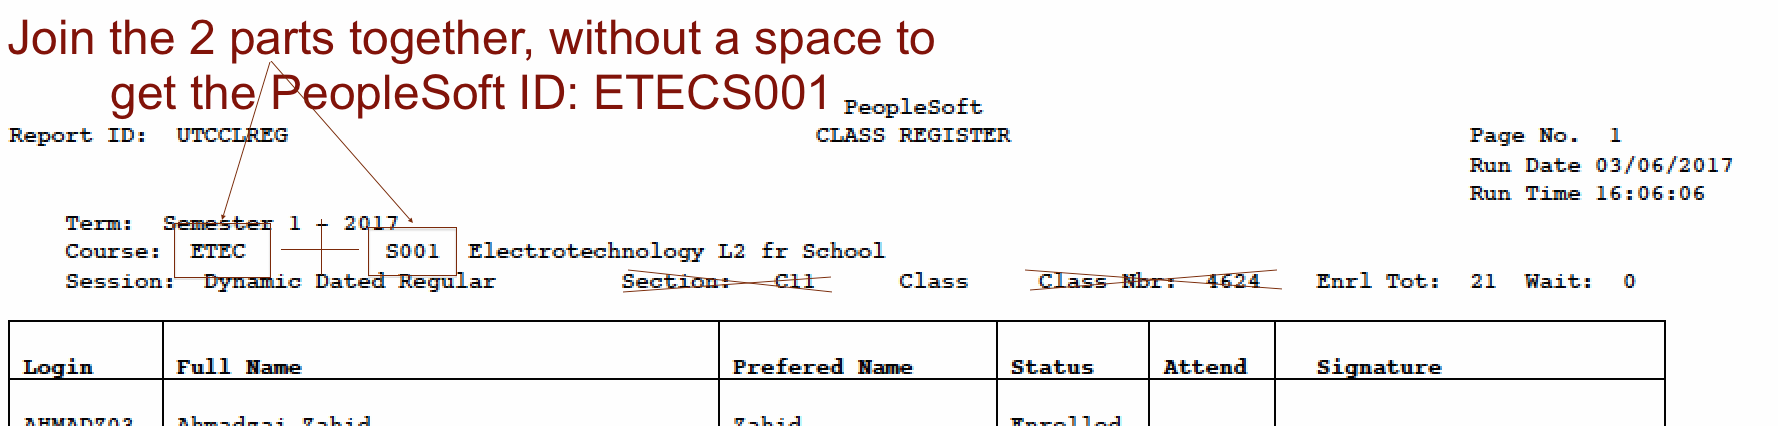
NB: Only one course on Moodle can use the same PeopleSoft ID.


Course enrolment or Programme enrolment?

Moodle Peoplesoft ID field can accept either the Peoplesoft Course or Programme code.

A Peoplesoft course code is PeopleSoft Subject + PeopleSoft Category (ie. APMG8099). There is no space between them. The wrong ID will enrol the wrong students or none!


The list of all Programmes and their PeopleSoft IDs can be found here.

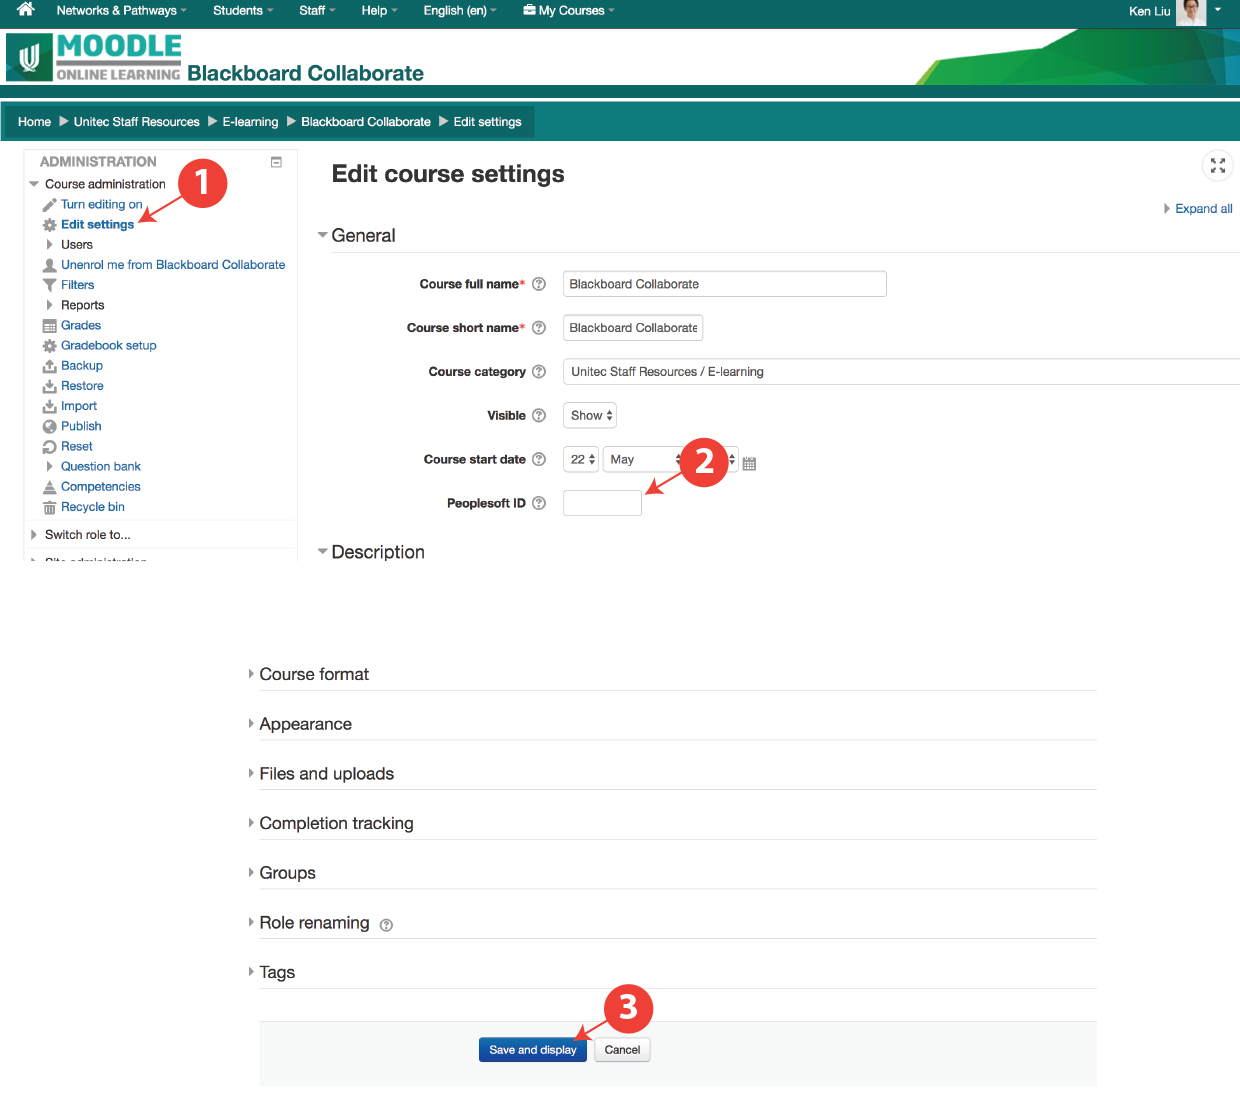
Enrolment - Enrol your students into Moodle

To ensure your students are enrolled in your Moodle course, you will need to do the following:
  1. Get the Peoplesoft ID from your Academic Administrator
  2. Ensure the Peoplesoft ID is entered into your Moodle course
Follow the steps below to enter your PeoplesoftID into Moodle:
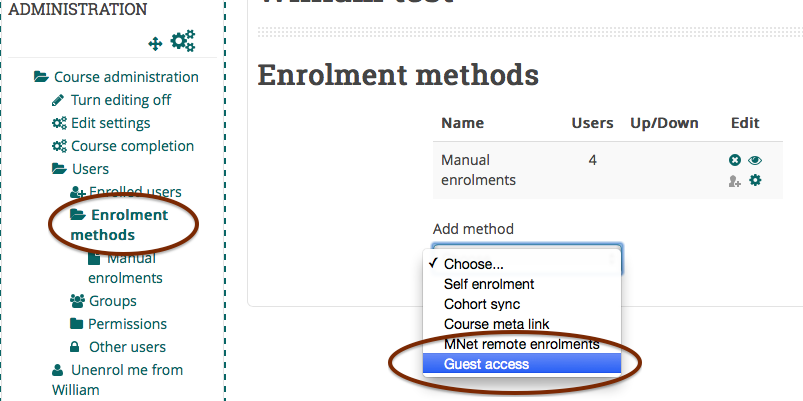
  1. Click “Edit Settings” under the administration block
  2. Enter your Peoplesoft ID into the Peoplesoft ID field
  3. Scroll down and click on the “Save and Display” button

Steps

Now your students should be enrolled in your Moodle course in next server cron job runs, you can check it out the next day!

Enrolment - Guest access


Guest access allows people who are not enrolled in your course, or even people who don't have Moodle accounts at all, to access your course page. This is not a way of enrolling students or teachers into your course.

Guests cannot participate in the course in any way (forums, assignments, etc) but they can view anything that an enrolled student can view.

Courses with guest access enabled are required to have a password set, with the possible exception of some programme or pathway "homepages". If you believe your programme or pathway requires a homepage with open access, you must get permission from Te Puna Ako and measures must be put in place to ensure sensitive data for students and staff are not made available to visitors from outside Unitec.

NB: enabling guest access (but without a password) gives Google access to your course. If you have sensitive or copyrighted material in your course, do not enable guest access. If you do want to enable guest access, make sure you have set a guest password.

The instructions below are for historical purposes.


1. Course administration > Users > Enrolment methods:

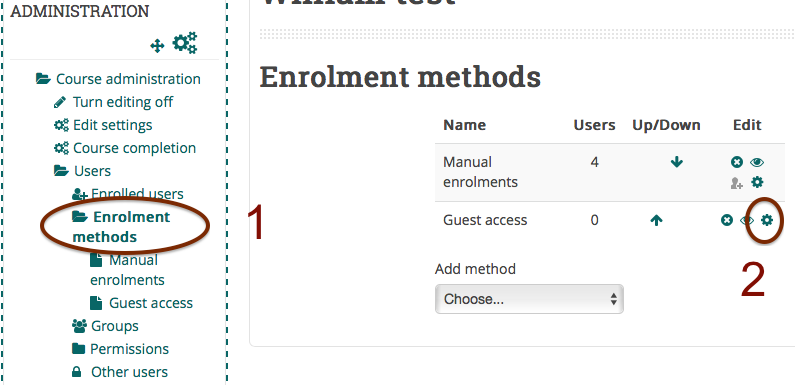
Make sure the the eye is open, so guests can access to your course.


Or choose "Guest access" from the "Add method" drop down menu if it isn't there already:


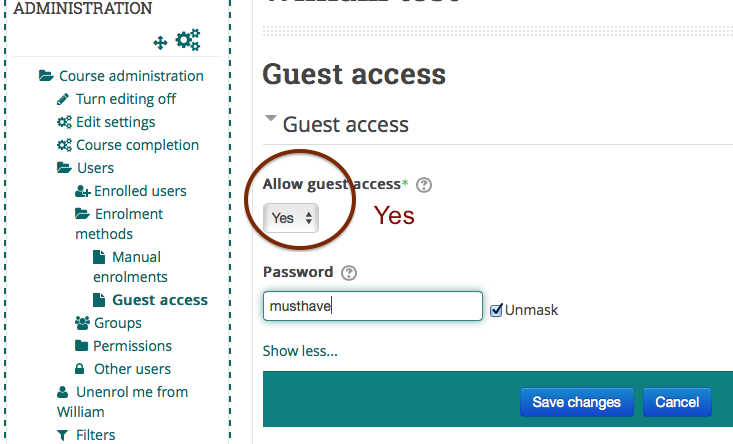
2. Click the edit icon to set a guest password:


3. Click "Save changes"

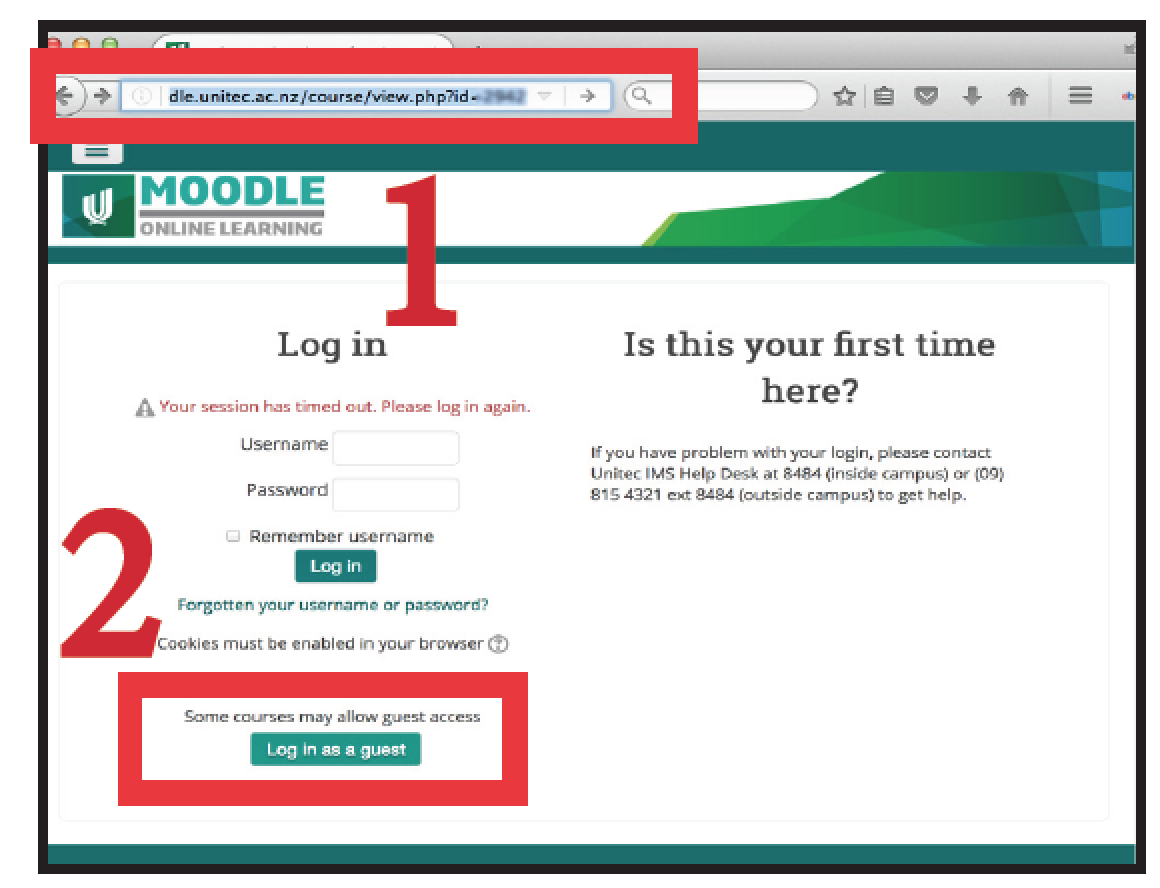
Enrolment - Guest access info for students

How to access a course as “Guest

Step 1:

Follow the course link which your tutor gave to you, i.e:
moodle.unitec.ac.nz/course/view.php?id=12345


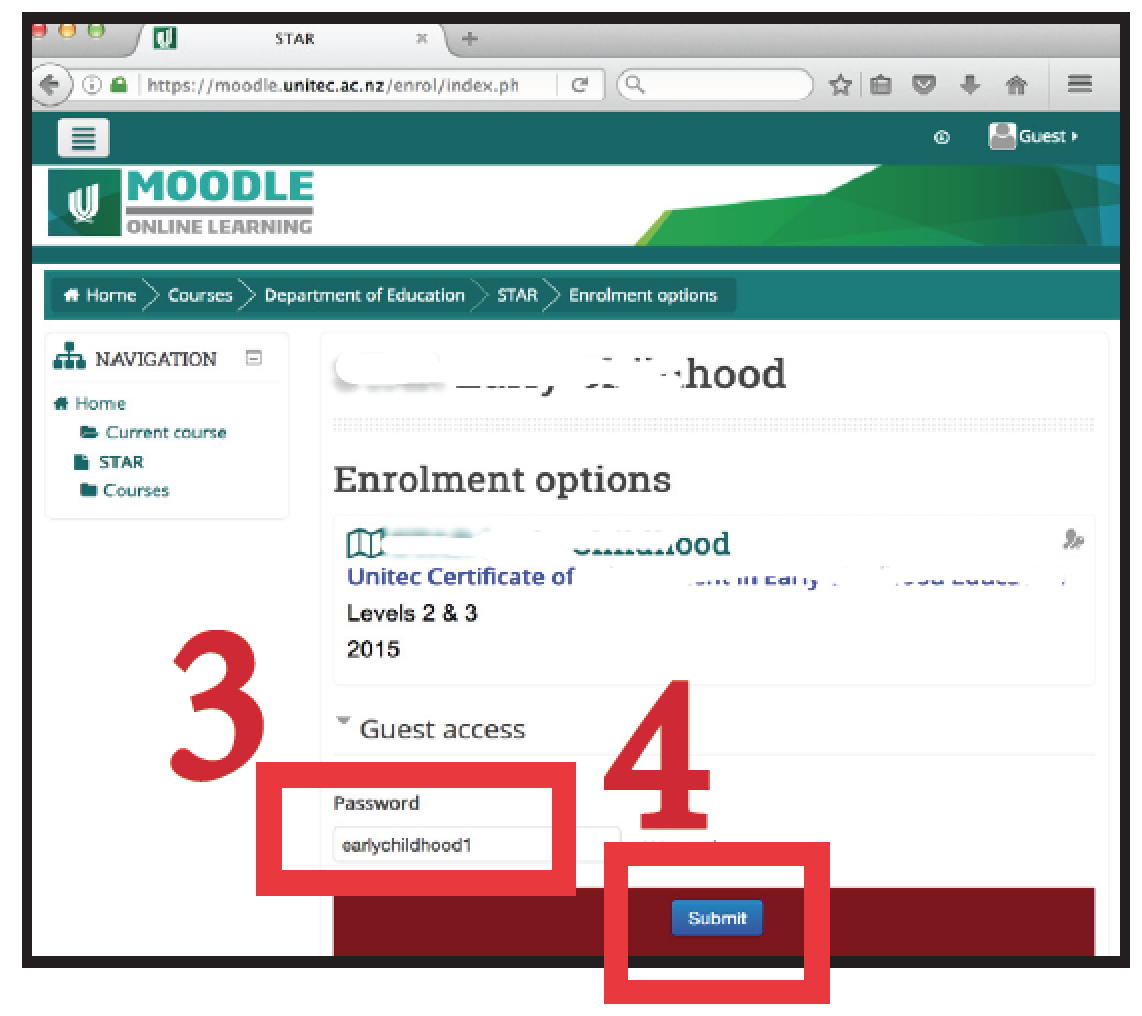
Step 2:

Click on the button: “Log in as a guest

Step 3:

Enter the password which your tutor gave to you.


Step 4:

Click on the button: “Submit”


Tip:
It will be convenient if you bookmark this page.

Note:
Don’t let others know the password.

Enrolment - Manual enrolment

Manually enrolling staff into your Moodle course means that you as a teacher/course administrator search for and add each teacher, and have to then remove them later when they no longer need access. Please don't manually enrol any student. Students are enrolled automatically by PeopleSoft.

Instructions:
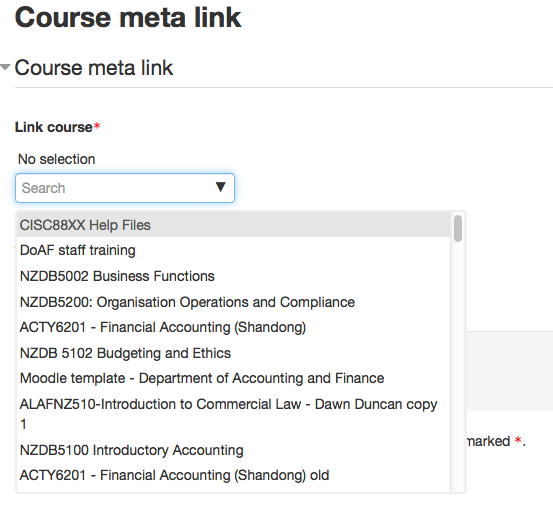
  1. Course Administration block > Users > Enrolled users
  2. Click "Enrol users" button
  3. Choose role (teacher or non-editing teacher)
  4. Search for user (type into search box, press Enter on keyboard)
  5. Click the "Enrol" button by their name

Enrolment - Meta enrolment (meta link)

Use this when you want to pull enrolments (student and teacher) from another course into your course.

NB: You must be a 'teacher' or higher level in both courses to set this up.

Instructions:

  1. Go to the course you would like to pull the enrolments into
  2. (Administration block) Course administration > Users > Enrolment methods
  3. At the bottom of the list of existing enrolment methods there is a drop down menu "Add method". Select "Course meta link" from the menu.
  4. Find the course you would like to pull the enrolments from in the drop down menu, or search the course name, then and click "Add method"

Done! Now all students from the other course will also be enrolled in yours. When they are unenrolled from the other course, they will also be unenrolled from yours.