Reset Turnitin assignment
Option 1: (Copy) says Create Duplicates, New Turnitin Class.... |

Resizing images before uploading to MoodleIt is often best to resize images before you upload them to Moodle. This makes their file size smaller, and means less data your students have to download every time they view the image. Here is a quick instructional video on resizing an image using a free browser-based tool called Pixlr Editor. You don't have to install something, just go to the Pixlr website and start using it! Instructions:
It is now ready to upload to Moodle! |
Resizing images in MoodleYou can do this using free software such as Gimp or Paint.NET. On a Windows machine, you can use the inbuilt Paint software to resize images. On Macs, you can use iPhoto. If you need to tweak an image size slightly after uploading, it's easy.
NB: Super hint! If you wish an image to resize automatically to the size available on the screen, then remove the height property in the image dimensions, and add 100% (or whatever percentage) to the width property! The image will then scale / resize automatically!
Resize this window and see the difference between these two pictures. One will resize, the other will not:
|


ResourcesThese are items containing information/knowledge that a teacher offers to support learning. To add a new resource to your course you must first turn editing on
Note: There are now two methods for adding activities and resources to course pages, you may either use the traditional Add activity or resource link or the new Activity chooser. Check the Administration block to see if you have the Activity chooser turned on or off. You may turn the chooser on or off by clicking on the entry within the Administration block.
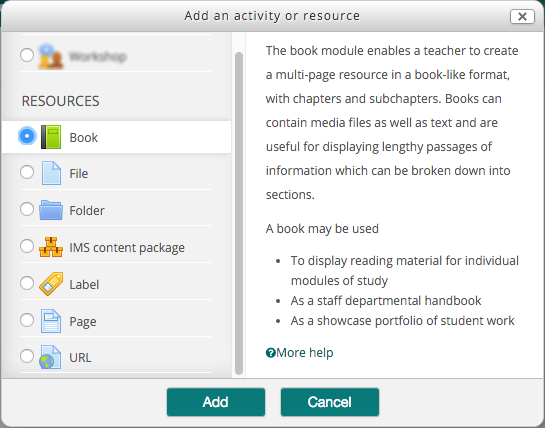
Add an resource using the Add activity or resource linkNote: To use this method the Activity chooser must be turned off
The Add an activity or resource window will appear. Scroll past the list of activities to select the type of resource you wish to add and click the Add button, otherwise click Cancel to return to your course page.
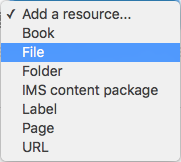
Add a resource using the Activity chooserNote: To use this method the Activity chooser must be turned on When enabled the Activity chooser replaces the Add activity or resource link described above with two drop down boxes one for resources and one for activities.
Scroll to the bottom of the section where you wish to add the resource and click the Add a resource drop-down menu. Click on the resource type you wish to add from the list that appears.
This page describes the process of adding resources to your course page, however, the process of adding activities is essentially the same. |
Resources - BookPresents content in a textbook format, allowing for chapters and subchapters (2 levels only). Pages can be enhanced by multimedia. Setting up a book: Choose "Book" from the "Add an activity or resource" menu. Give the book a name. You can give it a description, though this is not necessary. Chapter numbering
Custom titles Normally the chapter title is displayed in the table of contents (TOC) AND as a heading above the content. If the custom titles checkbox is ticked, the chapter title is NOT displayed as a heading above the content. A different title (perhaps longer than the chapter title) may be entered as part of the content. You will be prompted to add your first page (chapter) when you create the book. Add in a title (this will show in the book table of contents) and content (this will display in the main page area). Adding pages (chapters and subchapters): Make sure you have editing on when you are viewing your book to edit and add chapters. You will know if you do, because the table of contents will have editing icons after each chapter/page like this:
When adding a page you have the option to make it a 'sub-chapter'. This nests the page under the one you clicked the plus icon by. When you have multiple pages, there will be another icon which lets you change the order of pages in your book: |
Resources - FileA document presented for students to download - PDF, Word, Excel, PowerPoint, image... Adding a file: Drag and drop the file onto your course page (make sure you have editing turned on before doing this). OR Choose "File" from the "Add an activity or resource" menu. Give it a name. Description is optional. Drag the file into the drag and drop box or choose the "Add..." button to browse for the file on your computer. Once the file appears in the box on the Moodle page, you can continue. Appearance Display This setting, together with the file type and whether the browser allows embedding, determines how the file is displayed. Options may include:
Display size Displays the file size, such as '3.1 MB', beside links to the file. If there are multiple files in this resource, the total size of all files is displayed. Display type Displays the type of the file, such as 'Word document', beside links to the file. If there are multiple files in this resource, the start file type is displayed. If the file type is not known to the system, it will not display. |
Resources - File - Linking to Office365 documents for studentsThis page describes a method for creating read-only links for students to view office documents directly in the browser. DescriptionIt is common for teachers to want to put content on a Moodle course for students to access. This may be in the form of Microsoft Office documents such as Word, Powerpoint or Excel. Traditionally a teacher might upload these documents as File resources, either as the original file type (eg. doc, ppt, xls) or exported to PDF first. This method works fine, but these resources need to be carefully maintained should the content of the file need changes in future. An alternative solution may be to create read-only links for students to view live documents directly in their browser, while also allowing the teacher to edit the content without any need to update or otherwise maintain links in Moodle. Step 1: Get a link for your office documentThis requires your document to be stored in OneDrive or SharePoint and the document open in your web browser. Once the document is open and you are satisfied the content is ready to share with your students, click the Share button in the top right corner of the window. or This will bring up the sharing popup, click on Get a link on the left hand side, then click on the drop down list to select appropriate security options. If you wish to restrict access to Unitec students only; select View link - account in your organization required, otherwise if you want anyone to be able to view the document; select View link - no sign in required. Warning: Do not leave the drop down list in the default Edit link - no sign in required state; this will mean anyone will be able to edit your document! Select one of the View link - options instead. Once you have selected the appropriate View link - option you are ready to select and copy the URL link provided. Right click on the URL box and select copy from the drop down menu (or use control-c to copy the text). You are now ready to move onto the next step. Step 2: Create a URL resource in moodle and link to your documentGo to your moodle course page and Turn editing on, then use the activity picker to create a new URL resource. Give your link a meaningful name, and an optional description if you wish. Paste your URL into the External URL box It's a good idea to check that your URL resource is setup to open in a new window so that students don't lose their place in Moodle by following your link. This is done under appearance. Check any other settings you might wish to change, for example displaying the description on the course page and automatic completion tracking when students view the resource. Finally, click Save and Return to Course and you are done. Turn editing off for your course and check your newly created link works correctly. |
Tame your Google Gmail filterWhy I didn't receive any email from Moodle?Unfortunately, there's no easy way for you to ensure your emails don't hit the Promotions tab. It's also unclear how Gmail decides whether an email is "promotional" or not. Below is how to "teach" a gmail account to treat your emails as primary. This can be done by clicking on the email (without opening it) & dragging it to the "primary tab". You will then see a message that says: "The conversation has been moved to "primary". Undo Do this for future messages from "email address x"?Yes" If you click yes, all future emails from that address will go to the primary tab. This will certainly work for each individual who does it, I.e.. Each person who does it, their gmail account will always send your emails to the primary tab. |
Tidy up your courseThis entry contains suggestions for how to tidy up your moodle course.1. If you’re not using it, delete it, or drag it to a hidden section2. Put links into a Glossary or a Page (to reduce scroll of death)Glossary features:
Page features:
3. Put files e.g PDF, Word or PPT into Folders (or Glossary) or do 5. belowFolder features:
4. Videos and imagesPut videos into a 'page' by either adding a link or inserting the embed code. Don't put the video on your course homepage, as it will take time to load. Reduce your image size - otherwise, it will take time to load. 5. Instead of uploading Word, Ppt, Excel etc files , use Office 365 and link from there.Benefits:
6. Contact Te Puna Ako staff for help with how to do any of these steps (or search in the Guide to Moodle for the relevant word e.g. page/glossary).......... enjoy your tidy course!! |
Turn editing on |