Adding a link to a resource in a pageSometimes you will want to add a link to a file or other Moodle resource inside a Moodle page - like your Assessments page or your Welcome page. Instructions:
|
Enable JavaScript on browsersGoogle Chrome
Internet Explorer
Mozilla Firefox
Apple Safari |
Enable Java on your computerFind the Java Control Panel on Windows
Windows 8
Use search to find the Control Panel Press Windows logo key + W to open the Search charm to search settings In the search box enter Java Control Panel Click on the Java icon to open the Java Control Panel.
Windows XP
Click on the Start button and then click on the Control Panel option. Double click on the Java icon to open the Java Control Panel.
Find the Java Control Panel on Mac
Launch the Java Control Panel on Mac OS X (10.7.3 and above) Click on Apple icon on upper left of screen. Go to System Preferences Click on the Java icon to access the Java Control Panel.
Change Security settings:
Security tab: Allows you to configure various settings related to security such as grant permissions to content, alert users about site certificates, enable trusted publishers and blacklist revocation checks.
How to Enable Java on your browser
Firefox
Safari
|
Compression PDF FileNot all files will benefit from compression. If it is already optimized, you may not be able to reduce the file size any more than it is.
Using Online Tools: SmallPDF (http://smallpdf.com)This website will compress PDF files and quickly return them to you. There is no limit of the size of the file, or the number of times you can use the service. You can drag and drop the file into the box on the website. Wait until the file is uploaded and compressed. The compression may take a few minutes, especially for larger files. Once the compression is complete, the website will send you the new file.
Using Macintosh PreviewClick File and select export. In the options, click the Quartz Filter menu, and select "Reduce File Size." Save the file. Select your desired location, then click Save. Your file will be saved in a much-reduced size. This may result in a noticeable drop in quality.
Using the Adobe Acrobat “Reduced Size” CommandOpen the PDF file you wish to reduce in Adobe Acrobat. This is not an option in the free version of Adobe Acrobat (which is Acrobat Reader). From the File menu hover your cursor over “Save As Other…”, which will open a new submenu. Select “Reduced Size PDF”. Select what versions of Acrobat you want the PDF to compatible with. Choosing newer versions will result in smaller file sizes, but will render the file un-openable in older versions of Acrobat.
Using the Adobe Acrobat “PDF Optimizer” CommandPDF Optimizer provides finer control for reducing the size of PDF files. For most users, the default settings will provide the best reduction in file size. Optimizer saves space by removing embedded and duplicate fonts, compressing images, and removing items from the file that are no longer needed. From the File menu hover your cursor over “Save As Other…”, which will open a new submenu. Select “Optimized PDF…”. Click the “Audit space usage” button to see a breakdown of what is taking up space in your PDF file. This will allow you to see if your images are making the file too big, or if your embedded fonts are inflating the size. Each aspect of your PDF will be rated by bytes and percentage of total size. Adjust your settings. Leave as default, or fine-tune your settings as needed. You can switch to different aspects of your PDF (Images, Font, Transparency, etc.) by using the menu on the left side of the window. You can choose to not optimize specific aspects by unchecking the boxes next to each menu item. This can be useful if you want to optimize the text but leave the images unaltered. When optimizing images, you can change color images to grayscale, compress, downsample, and lower the quality. Compression of images can result in poor quality that is not suitable for printed materials. Always check the quality of your optimization before committing to saving the changes. When optimizing fonts, unembed fonts that you know all of your readers will have. For example, if you are sending the PDF to people at your school, they most likely will all be using the same system to read it, so those fonts do not need to be embedded. Press OK. Your PDF will be converted using the new settings. You can check the new size by saving the file or by opening the PDF Optimizer again and clicking “Audit space usage” button.
Use the “Save as” in Adobe Acrobat and in Microsoft WordThis will allow a huge decrease of the size of your file (for example, it can make you file go from 200 kb to 20 kb => 10 times smaller in some situations)
|
Reduce Microsoft Word and PowerPoint Document File SizeIf you created a Microsoft Word or PowerPoint documents but have realized that it is too large to be shared by email; or you’re low on disk space; or even can’t upload it to Moodle, don't fret! Follow this guide to get your document file size compressed. Use compressed graphics file formatsIf you have images in graphic formats like bitmap (.bmp) in your documents, you should convert them into one of the following graphic file formats: .jpg(jpeg); .gif or .png. Insert graphics instead of copying and pastingPeople like to use copy and paste to add graphics into a document. The feature is effortless, but it’s not efficient as the pasted image is a bitmap file. The differences in file sizes can be astounding especially if you’re using a file format such as JPG as your source. Choose E-mail (96 ppi) outputInside your document, click one of your picture, you will see a tab “Format Picture” appears at the toolbar area. Click the “Compress” button on the “Format Picture” tab; select the “Best for sending in e-mail (96 ppi) from the “Picture Quality” dropdown menu; tick the “Remove cropped picture regions” checkbox; and select the “(Apply to) All picture in this file” radio button. Then, click “OK”. This would change all the pictures used in your document to an optimal size. If you are using the latest version of Word or PowerPoint, you can simply go to File > Reduce File Size… Insert a hyperlink instead of inserting an objectWhen you insert an image or a media file, you have the option to insert it either as an embedded object or as a linked file. Insert > Photo/Audio/Movie > Photo/Audio/Movie from File.. > Select the file you want to insert; tick the “Link to File” checkbox. By inserting it as a linked file means it will not become a part of the final document file. But you should always make sure that the linked file is with you and in the computer where you will open the document. Otherwise, the hyperlink won’t work. Turn off Preview PictureThe preview picture is the thumbnail of the document’s first page. This thumbnail shows in the Details section of Windows Explorer when you highlight the file. Usually, this isn’t an issue unless your first page displays a graphic. To turn off Preview Picture in Microsoft document, go to File > Properties, Select the “Summary” tab, then deselect the check box for ‘Save preview picture with this document’, click OK. Save your document a second timeOpen your document, go to File > Save As… and give it another name. Then click “Save”. Doing this you will have a second document that often is smaller than the original copy. This is because Microsoft Document usually stores lots of redundant information such as earlier drafts and previous used images. Once you save it as another file, the unnecessary redundant information would be purged. |
Reduce image file sizesSometimes you get a message that you need to change an image size when trying to upload a picture. You may need to resize images to make them smaller without affecting the quality. Free tools for reducing image size: The best and easiest from Google: https://squoosh.app/
|
Grade Me blockA block that teachers can add to courses so as to quickly find ungraded assessments. Turn editing on > Add a block > Grade Me
|


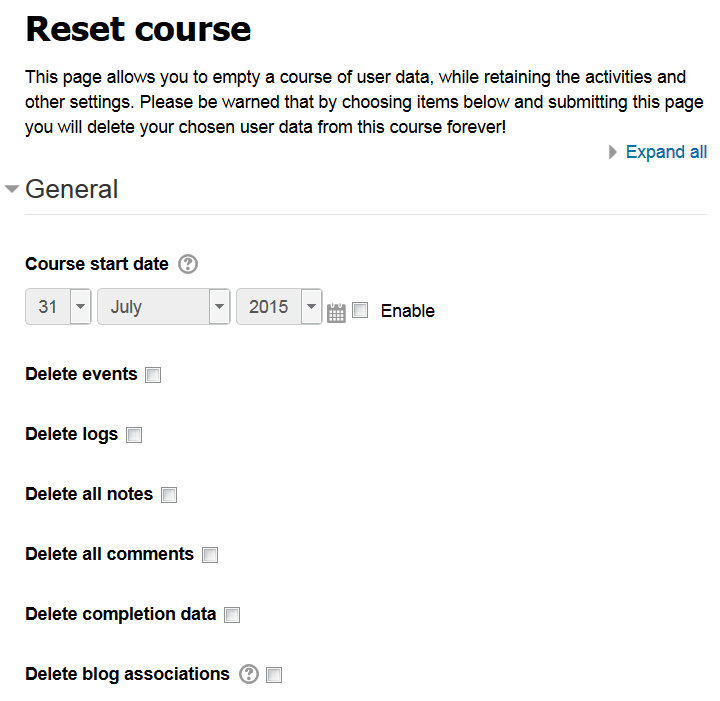
Reset a courseResetting your course can be useful between lots of students to purge out old user data so that the course is fresh. Of course there are times when you wish to keep old user data (like previous forum posts for students to build on) so be careful using this feature. You'll be taken to a settings page where you can choose what you wish to reset in the course.
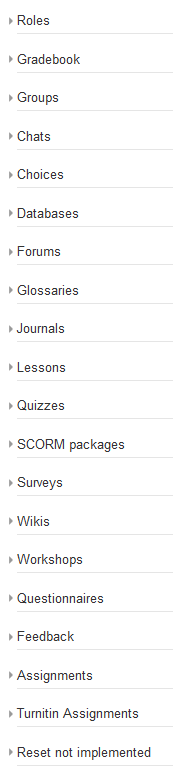
If you're using weekly format (rather than topics format) this can be a good place to change the course start date so that the weeks display properly for the new semester. Be careful deleting anything else in this section unless you're really sure. Then, depending on which activities you have in your course, you may see some other settings areas:
These allow you to delete the data from any of these activities. Your activities themselves remain, ready to be used by the next lot of students. Note that you will still need to go through assignments and other items that have due dates set to make sure that the due dates are updated for the new lot of students! |
Activities - Turnitin AssignmentCreates a Turnitin Moodle Direct assignment which links an activity in Moodle to an assignment / assignments on Turnitin. Once linked, the activity allows instructors to access and provide feedback for student's written work using the assessment tools available within Turnitin's Document Viewer. Walkthrough video: https://vimeo.com/203368521
Steps: Setting up a Turnitin Assignment: To create a Turnitin Assignment open the course home page, after logging in as a tutor click the 'Turn editing on' button. Select 'Turnitin Assignment' from the 'Add an activity...' drop down menu. General Turnitin Assignment settings:
Advanced Turnitin Assignment settings:
Once you have selected all of the required options click 'Save and Display' to be directed to the Summary screen where you will see options to configure each assignment part in more detail. Assignment Submission Dates After completion of the assignment settings the 'Summary' page gives you the opportunity update the assignment parts and balance the grades awarded for each part as a proportion of the overall grade. The edit the dates and grades awarded for each part click the pencil icon. The default dates for each assignment part are initially set to be one week from the date the assignment was created.
|
Tame your Google Gmail filterWhy I didn't receive any email from Moodle?Unfortunately, there's no easy way for you to ensure your emails don't hit the Promotions tab. It's also unclear how Gmail decides whether an email is "promotional" or not. Below is how to "teach" a gmail account to treat your emails as primary. This can be done by clicking on the email (without opening it) & dragging it to the "primary tab". You will then see a message that says: "The conversation has been moved to "primary". Undo Do this for future messages from "email address x"?Yes" If you click yes, all future emails from that address will go to the primary tab. This will certainly work for each individual who does it, I.e.. Each person who does it, their gmail account will always send your emails to the primary tab. |