Course settings - General
Course full name is the full name of the course that will be displayed in the "My Courses" menu and block. They should follow this format: PeopleSoftID - Course full name eg ETEC3821 - Electrical Fundamentals A Course short name is displayed in the navigation/breadcrumb menu. This should be your PeopleSoftID code. Category should be the programme or department your course is in. Visible should be set to "show" if you wish students to see, "hide" if you wish only teachers in the course to see it (ie it is under maintenance). Course start date - ignore this, it doesn't affect anything. PeopleSoft ID - if you want your students to be automatically enrolled into your course, make sure your correct course PeopleSoft ID code is entered here. |

Course settings - GroupsYou can create Groups, and add specific students to it. The purpose of this might be to give feedback to groups of students working together which is only relevant to that group. To create Groups, first go to the Administration Block>Edit Settings>Groups. Then fill in fields. Then you can go back to Users>Groups>Create groups. After that click add/remove users to add students to your Groups.
We generally recommend leaving these settings as you see above. Group mode
The group mode defined at course level is the default mode for all activities within the course. Each activity that supports groups can also define its own group mode, though if the group mode is forced at course level, the group mode setting for each activity is ignored. Force group mode If group mode is forced, then the course group mode is applied to every activity in the course. Group mode settings in each activity are then ignored. Default grouping You can choose a default grouping for all activities in the course to be available for. |

Enrolment - Automatic enrolmentBy using the PeopleSoft code, you can let PeopleSoft automatically enrol your students into your Moodle course. They will be enrolled one week before the PeopleSoft course start date, and unenrolled two weeks after the PeopleSoft course end date. If you need them in longer than these dates, please email yliu@unitec.ac.nz with the course code and the new requested start and end dates. Instructions:
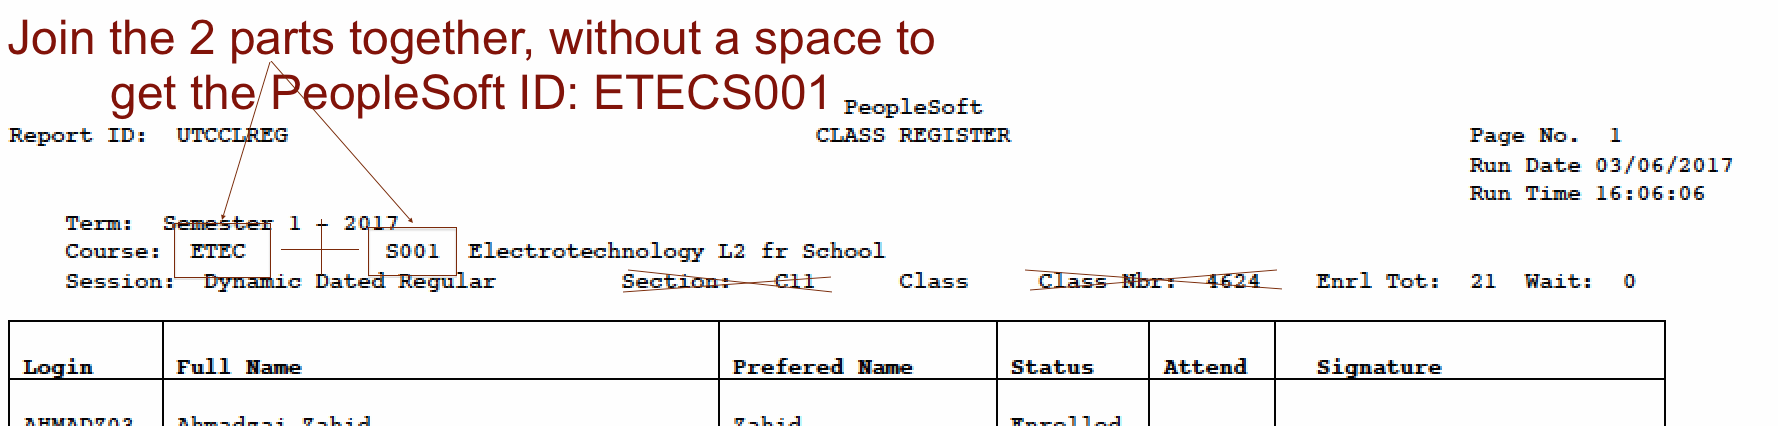
NB: Only one course on Moodle can use the same PeopleSoft ID. Course enrolment or Programme enrolment? Moodle Peoplesoft ID field can accept either the Peoplesoft Course or Programme code. A Peoplesoft course code is PeopleSoft Subject + PeopleSoft Category (ie. APMG8099). There is no space between them. The wrong ID will enrol the wrong students or none!
The list of all Programmes and their PeopleSoft IDs can be found here. |
Enrolment - Manual enrolmentManually enrolling staff into your Moodle course means that you as a teacher/course administrator search for and add each teacher, and have to then remove them later when they no longer need access. Please don't manually enrol any student. Students are enrolled automatically by PeopleSoft. Instructions: |
Enrolment - Self-enrolmentThis lets students enrol themselves in your course. You can put a password on so that not every student can just enrol. NB: students who have self-enrolled must either unenrol themselves from the course when they are done, or the teacher must unenrol them manually. They will not be removed automatically when the course finishes. Instructions:
(we recommend deleting guest access as this will make the 'Enrol me' button to be located in an obvious pace) |
Grades - Manual grade overrideSometimes it is desirable to modify a student's grade from what moodle has generated (for example a quiz grade). This is called manual grade override. Setting these overrides is very easy it's typically just a matter of clicking on the grade while reviewing an activity attempt or submission and typing in a new one. Clearing these overrides is not so straight forward, it requires going into the gradebook setup and removing it. |
Grades - moodle Gradebook setup / Weighted mean of gradesIt is important to differentiate between the moodle gradebook found on your moodle course and the Unitec gradebook accessed through The Nest. These two systems are not the same and are not linked together. It is however possible to make the moodle gradebook in your moodle course correctly align with the weightings for the various assessment activities. This will provide better feedback for your students about their current progress and make your final input of grades into the Unitec gradebook much simpler. |
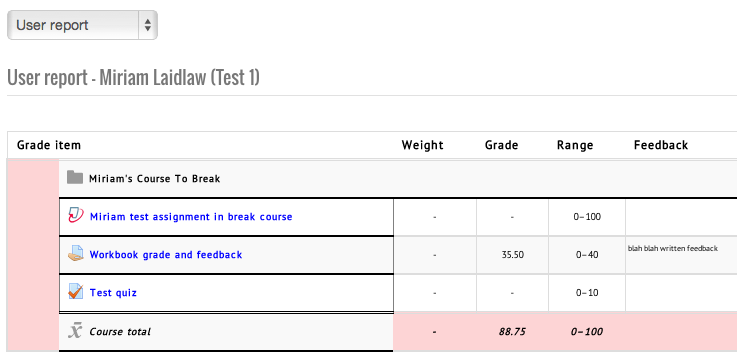
Grades - User report (analytics) |
Groups - Adding/removing groups from groupingsOnce you have created your groupings and your groups, you need to assign groups to groupings.
Removing groups follows the same process, but instead of selecting the group from the right hand list and clicking "Add", you select it from the left hand list and click "Remove". |
Groups - Adding/removing users from groups
|