Samstag, 27. Juli 2024, 11:45
Website: Unitec Online
Kurs: Guide to Moodle (Guide to Moodle)
Glossar: Guide to Moodle
I

If I change a question in the Question Bank, will it be changed in all the quizzes it appears in?

Yes, If you changed a question in the Question Bank, it will change in all the quizzes it appears in.

Questions really live in the Question Bank. When you add a question to the quiz, you are just making a link from the quiz to the question in the Question Bank.

So, you can add one question to many quizzes, and then if you edit it, it will change in all quizzes.

If you want to change any question, you have to:

  1. Duplicate the question in the Question Bank
  2. Edit the duplicated question in the Question Bank
  3. In Quiz, add the modified question from the Question Bank and remove the old question.
  4. The old question will stay in the Question Bank untouched and may exist in some other existing Quizzes, so you can leave it there if there’s nothing wrong with it. 
  5. If you do want to remove the old question from the Question Bank, you can. But it will only be removed from the list - actually, it will stay forever in the system under the checkbox ‘Also show old questions’.

What happens if you change the correct answer, but the Quiz has closed and the students have already been graded?

  • The changes will show in the Question Bank.
  • The past quiz result will remain untouched, even though the correct answer has been changed.
  • The ongoing quiz will be marked with the new correct answer.
  • You can also duplicate the question in the Question Bank, change the answer and add the new one in. This way, you leave everything in the past quiz as it was.

Image attributions

You can attribute images in several ways, and the important thing is that they are attributed correctly.

Always check whether you are allowed to use images. Images that you find on Google Search are not all just free for use. Always go to the source of the image and check whether the person who posted it is happy for you to use it! Then make sure you mention the actual source (Google Images is not a source!).

Ways to attribute images:

  • When you upload the image to Moodle, it asks for Author and Licence. Make sure you change these to reflect the actual owner and licence of the image. Also make sure you repeat this information in the image description. If you have done both of these steps, that is all that is needed.
  • You can put a note at the bottom of your page, or in a block, stating where you got the images (the original source, remember not Google Images), and what sort of licence the image is under.
  • You can put this information in a caption under your image.

-------

For example, this image here says "No attribution required". This means you don't have to attribute the original source, however, you should still state under which licence this image is used so that people know that it is public domain, no attribution.

License: CC0 Public Domain, no attribution required

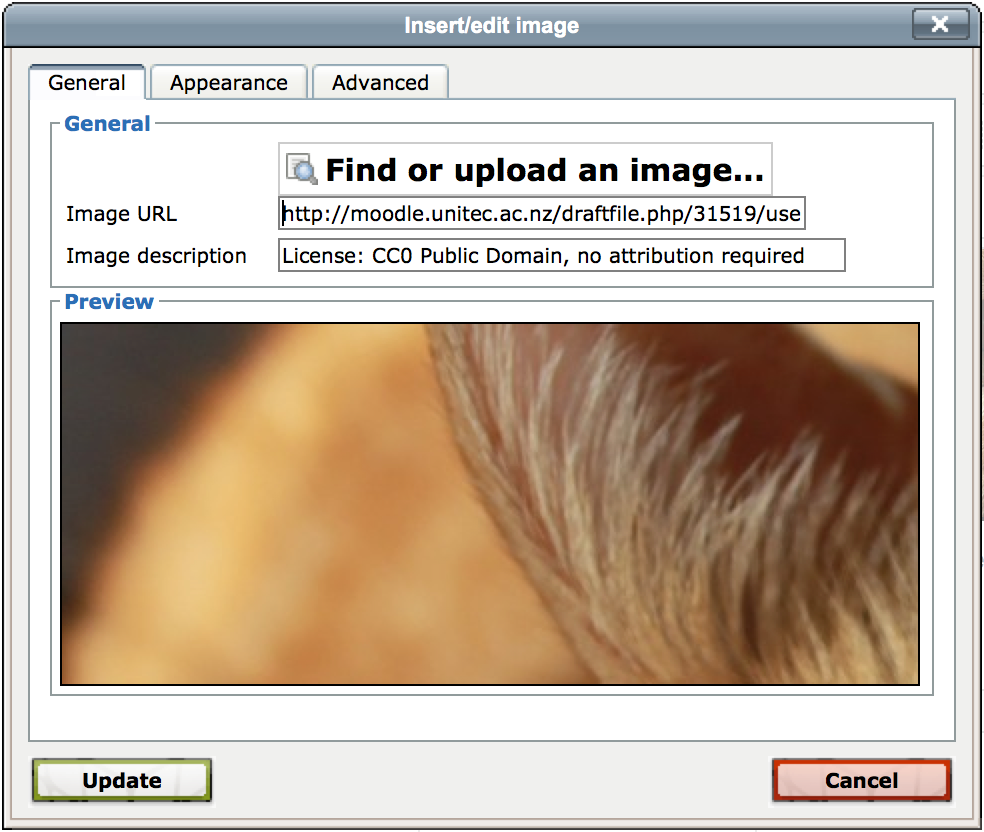
Image licence: CC0 Public Domain, no attribution required.

We have put the licence information in the image description, though the hover text (also called alt text) doesn't seem to work in a glossary. If you find that is the case where you have placed your image, it is best to also put the information in a caption (as above), or a side-block.

-------

Put licence in image description like this:

Licence information is in the image description field

HOVER TEXT - Add the image, go to the "advanced" tab and put the hover text required in the "title" field

Images or pictures

Adding images or pictures to your course page can sometimes be done by dragging the picture into the editing window. This doesn't really add the picture properly, though, and it is recommended that you use the picture uploader tool instead.

NB: you must have the image saved to your computer first! Best formats are PNG, JPG or GIF. 

  1. In the editing toolbar you will see a picture buttonAdd an image- click this.
  2. Click "Find or upload an image".
  3. If the middle panel doesn't already have a "Browse" button, click "Upload a file" off to the left, then click "Browse".
  4. Find the image on your computer and select it.
  5. You may want to edit the author and license information for the image. By default the author is the person who is logged in and uploading the image, and the license is "All rights reserved". (Click here for more information on licenses.)
  6. Click "Upload this file".
  7. It is important to fill out a description. If someone uses screenreading software (because they are vision impaired) then the description is what is read out to them when the software encounters an image!
  8. Under the "Appearance" tab you can choose other options like how the image is displayed with text, set a size for the image, border etc.
  9. Click "Insert" when you are done.

NB: To edit any of these things after you've uploaded an image, simply select the image (so that it is highlighted) and click the insert/edit image icon again. You will be taken back to the same window, and the button will say "Update" instead of "Insert".

To reduce the file size of an image (so it loads quicker in Moodle):

(If the file size of an image is too big, your Moodle course can be slow too load, and it will take up lots of space).

  1. Hover over the image to check file size eg 12kB
  2. Right click and scroll to 'open with'
  3. Choose 'Paint'
  4. click resize
  5. select pixels
  6. Fill in Horizontal as e.g.180 (vertical will adjust automatically) 
  7. ok
  8. save as
  9. now you can insert it to Moodle